Life Pro Tip - Be careful how you store your lenses (E-M1 mark 1 screen replacement)

Lee Perrins

Mu-43 Regular
Joined
Jan 23, 2018
Messages
56
So, the thing I learned today is that now I have the 50-200 2.8/3.5 I need a bigger camera bag - or at the very least I need to pay attention so that the tripod mount on the lens is not touching the camera in the bag I already have. There is only so much a screen protector can deal with ...

P7030067.JPG
Subscribe to see EXIF info for this image (if available)


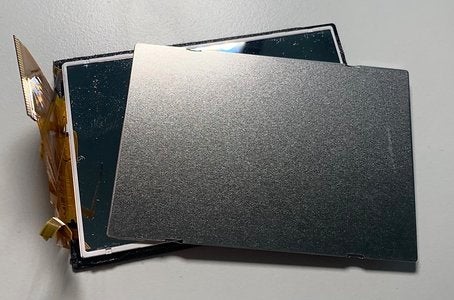
I also have an E-M10 and it seems like the screens are the same, so I've just partially stripped down the M10 to swap the screens over because I'm too impatient to wait for a replacement to arrive, but there is a lot of tape and sticky stuff holding the screen and circuit boards in place and it will never stick back quite the same, so I've decided discretion is the better part of valour and put the M10 back together and have ordered a new screen for the E-M1. Obviously I can use it with just the viewfinder for now, although you can't change anything in the menus.

I'll post 'how to replace the screen' images when the new one arrives.
 

RichardC

Pastafarian minister
Joined
Mar 25, 2018
Messages
5,509
Location
The Royal Town of Sutton Coldfield, UK.
Real Name
Richard
That is a disaster. It's a reminder to everyone that our camera gear is delicate - regardless of weathersealing etc. Maybe the flippy screen on the Mark 2 wasn't such a terrible idea after all?

It's been almost three years, but I am still not over breaking my Nisi 150mm square polariser into pieces. Should have paid the extra for a proper filter case.
 

Lee Perrins

Mu-43 Regular
Joined
Jan 23, 2018
Messages
56
That is a disaster. It's a reminder to everyone that our camera gear is delicate - regardless of weathersealing etc. Maybe the flippy screen on the Mark 2 wasn't such a terrible idea after all?

It's been almost three years, but I am still not over breaking my Nisi 150mm square polariser into pieces. Should have paid the extra for a proper filter case.
It's not so bad - a new screen was only £22, I just have to wait a few weeks for it to ship, and I can use the viewfinder in the meantime. Replacing it seems like it is quite straightforward, if a little fiddly.

Breaking a Nisi filter is definitely a disaster though!
 

doady

Mu-43 All-Pro
Joined
May 18, 2020
Messages
1,059
Location
Canada
Holy shit, wow. I'll definitely have to keep this in mind when finally get a second lens.

The tilting LCD of my C-7070WZ cracked after pulling it out too many times, but that was over 10 years, and the damage was minor compared to your E-M1. I just had to tape it and glue it back together but it works fine now. Magnesium alloy body? Oops, not quite.

p3539169109-6.jpg
Subscribe to see EXIF info for this image (if available)
 

ac12

Mu-43 Legend
Joined
Apr 24, 2018
Messages
5,259
Location
SF Bay Area, California, USA
I've been lucky with my dSLRs. All have similar unprotected rear screens.
Digital is very different from SLRs, where the back was simply metal.

For the same reason, I've started to flip around the screen of my EM1-mk2, so that the screen is facing in, when stored. To give it some degree of protection. But I think it is still vulnerable to impact.
 

PakkyT

Mu-43 Legend
Joined
Jun 20, 2015
Messages
7,247
Location
Massachusetts, USA
Obviously I can use it with just the viewfinder for now, although you can't change anything in the menus.
I don't have my E-M1.1 on hand but I think I recall if you are in the menus and press the monitor button (the one that switched between EVF and back LCD) it switches the menu from the back LCD into the EVF?
 

Lee Perrins

Mu-43 Regular
Joined
Jan 23, 2018
Messages
56
I don't have my E-M1.1 on hand but I think I recall if you are in the menus and press the monitor button (the one that switched between EVF and back LCD) it switches the menu from the back LCD into the EVF?
I thought it did that too but it shows (or tries to show) the menu on the main screen regardless - my E-M10 does the same, and I was sure that allowed you menu access with the viewfinder too! Maybe there is a setting somewhere?
 

Lee Perrins

Mu-43 Regular
Joined
Jan 23, 2018
Messages
56
My replacement screen has been dispatched apparently. Hopefully transit won’t take too long.
 

Armoured

Mu-43 Veteran
Joined
May 5, 2015
Messages
209
It's not so bad - a new screen was only £22, I just have to wait a few weeks for it to ship, and I can use the viewfinder in the meantime. Replacing it seems like it is quite straightforward, if a little fiddly.

Breaking a Nisi filter is definitely a disaster though!
I broke the touchscreen on my car and let's just say it's a lot more expensive than 20 quid. Not recommended.

And no, I do not wish to discuss how this happened. Too embarrassing.
 
Joined
Aug 13, 2014
Messages
6,652
Location
Honolulu, HI
Real Name
Walter
I've been lucky with my dSLRs. All have similar unprotected rear screens.
Digital is very different from SLRs, where the back was simply metal.

For the same reason, I've started to flip around the screen of my EM1-mk2, so that the screen is facing in, when stored. To give it some degree of protection. But I think it is still vulnerable to impact.
Can't beat padding to separate your gear.

Back when I had just a camera plus a lens or two, I would wrap my camera and walkaround lens in an OpTech Digital-D pouch and carry another lens in a Snoot Boot lens pouch, clipped to my sling. Kept them protected from light bumps and occasional drizzle. Sometimes, that's all I needed. Those are still useful for protecting gear dropped into an unpadded backpack or messenger bag.
 
Last edited:

Lee Perrins

Mu-43 Regular
Joined
Jan 23, 2018
Messages
56
Right, so the new screen arrived today, so I took apart the E-M1

It's much better put together than the E-M10, which is another way of saying it's harder to take apart.

The screen has to come out the front of the frame which means levering it out (carefiully) from the front. You still need to remove screws to take the back off the display so you can disconnect it all. No pictures of those, I'll take some when I'm putting it back together and pretend they were from when I was taking it apart :)

In my case the (now several years old) 1mm double sided sticky tape stuff holding the screen in place came apart on removal so I've had to order some more, which should arrive tomorrow. It's on a roll so I will need to cut it to length, so the corners won't be as neat as with the single bespoke piece Olympus have used, but it should be ok.

You can see what is left of the original mounting tape below.

1627153329414.png
Subscribe to see EXIF info for this image (if available)


These are the two screens - on the bottom the broken one as it came out the camera and the new one on top. The black tape on the top right corner and the square of tape are single sided. The square just keep the cable tidy. I don't know what the bit on the top right does, but I moved it over anyway.

The tape under the circuit board is double sided and holds the circuit board and the ribbon cable in place. Presumably it also insulates the back of the circuit board from the metal back of the screen?

Anyway, I can't get this tape off so I need to source some double sided tape as well tomorrow. Anyone else doing this will almost certainly need some too - the single sided tape is easy enough to peel off and reuse but the double sided stuff is impossible to get off in one piece.

1627153449789.png
Subscribe to see EXIF info for this image (if available)
 

Lee Perrins

Mu-43 Regular
Joined
Jan 23, 2018
Messages
56
Final update on this - the screen is now re-fitted.

The tools I found most useful:

  • Small crosshead screwdriver size P0
  • Swiss Army knife
  • (small blade for levering out the old screen, tweezers for removing old sticky stuff, back of tooth pick for smoothing down new sticky stuff, blunt bit of screwdriver / can opener for helping to shift old sticky stuff)
  • Scalpel (for cutting tape, especially the 1mm double sided stuff)

Your mileage may vary of course

Things I needed:
  • new screen
  • double sided tape to hold the circuit board in place (mine is labelled as 'carpet tape')
  • electrical tape (although you can re-use the black tape, it loses quite a lot of stickiness so best to replace it)

Things I learned

The circuit board has to line up with the depression in the back (hashed area, second image) and the little (tiny!) spongy thing (ringed in first image) has to fit exactly through the hole (red dot, second image) The first time I did it the spongy thing didn't line up properly so the screen wasn't flush.

I found it easier to stick this spongy thing on from the back of the display by using tweezers to place it through the hole, once the back was in place.

The tape on the top right of the screen that I previously said I wasn't sure wha tit was for is to insulate the screen from the copper tape (arrowed) I guess,
IMG_7922.jpeg
Subscribe to see EXIF info for this image (if available)

IMG_7942.jpeg
Subscribe to see EXIF info for this image (if available)


And finally, here it is working again. It still has the screen protector on, which has a bit of glue from the tape on it. I've left the camera with the screen flat against a bookshelf with a few books on top just to make sure the screen is sealed in ok.

IMG_7944.jpeg
Subscribe to see EXIF info for this image (if available)
 

Lee Perrins

Mu-43 Regular
Joined
Jan 23, 2018
Messages
56
Another update on this in case anyone finds it and follows the advice - the screen started to pop out again at the bottom right corner - this is where the ribbon cable folds over to the back of the screen, held in place with the black square of tape on the back of the original screen.

I think there was too much 'spring' in the cable of my new screen, which over the last week has gradually overcome the strength of the tape. So if you have found this via a search and are following the instructions, make sure you use new electrical tape to hold down the cables in that corner, and make sure they are as flat as they can be.

Then, when you have put it all together, you need to clamp it together so it sticks properly. By chance I overheard this advice in a phone repair shop earlier this week; a customer had come in to collect their phone and the guy told him he was too early - his screen was still in clamps while the glue set. It occurred to me that I just stuck the screen down and held it in place by hand for about 30 seconds!

I've taken the screen out again and replaced all the tape and it's now got a spring clamp on each corner (with some card on the screen to stop it scratching) and clothes pegs in the middle of each side. I'm going to lave it like that until I next need the camera (maybe tomorrow afternoon - it's school holidays after all) but it's going to be clamped at least overnight. If there are no more updates, it worked :)
 

Pantos

New to Mu-43
Joined
Nov 22, 2022
Messages
1
Another update on this in case anyone finds it and follows the advice - the screen started to pop out again at the bottom right corner - this is where the ribbon cable folds over to the back of the screen, held in place with the black square of tape on the back of the original screen.

I think there was too much 'spring' in the cable of my new screen, which over the last week has gradually overcome the strength of the tape. So if you have found this via a search and are following the instructions, make sure you use new electrical tape to hold down the cables in that corner, and make sure they are as flat as they can be.

Then, when you have put it all together, you need to clamp it together so it sticks properly. By chance I overheard this advice in a phone repair shop earlier this week; a customer had come in to collect their phone and the guy told him he was too early - his screen was still in clamps while the glue set. It occurred to me that I just stuck the screen down and held it in place by hand for about 30 seconds!

I've taken the screen out again and replaced all the tape and it's now got a spring clamp on each corner (with some card on the screen to stop it scratching) and clothes pegs in the middle of each side. I'm going to lave it like that until I next need the camera (maybe tomorrow afternoon - it's school holidays after all) but it's going to be clamped at least overnight. If there are no more updates, it worked :)
Thank you very much for this pioneer's work. I replaced my broken screen easily following your explanation. I'd just add a supplementary tip. Instead of replacing the processor on the back of the new screen, with new sticky tape etc., I just unclipped the clean back plate of my new screen (see photo: it comes off easily and unveils a very clean mirror) and replaced it with the old plate without moving any preexisting part. So I just had to lift the electric tape on the plate, reconnect and restick the tape.
 

Attachments

  • ecran.jpg
    ecran.jpg
    319.1 KB · Views: 54

armopower

Mu-43 Rookie
Joined
Dec 4, 2022
Messages
13
Location
Canada
Thank you very much for this pioneer's work. I replaced my broken screen easily following your explanation. I'd just add a supplementary tip. Instead of replacing the processor on the back of the new screen, with new sticky tape etc., I just unclipped the clean back plate of my new screen (see photo: it comes off easily and unveils a very clean mirror) and replaced it with the old plate without moving any preexisting part. So I just had to lift the electric tape on the plate, reconnect and restick the tape.
Ya I thought about this after changing the screen out. But was too late.

The best way to replace the back screen is as follows:

1. Do no remove any screws from the panel. Heat the LCD screen using a heat gun
be careful not to keep it at one spot. Go around the whole LCD screen in the back.

2. Once its properly heated, carefully take a small suction cup and place it on the right corner
of the LCD glass and pull on it abit, enough so that it creates a small gap, using a guitar pick
(NOT a metal object as this will cause scratches and damages to the camera) carefully slide is
under, as your re-heating again go around the whole screen until you remove the glue of the
edges of the glass carefully no to lift the screen too much.

3. Next, once the LCD is fully loose. Go and remove, the screws on the top 3, then 2 and the other
2 will be a total of 7 screws.

4. Lift up the screen from the bottom up, not from the top to bottom. Since the ribbon is short
if you lift up from the top down, you can rip the ribbon. Lift the LCD from the bottom up, wiggle
abit and carefully lift up the notch that will release the ribbon cable, you will also need to carefully
remove the square tape holding the ribbon too, I used plastic tweezers.

4. Leave the square tape on the ribbon flex, and remove the LCD.

5. Transfer everything over by removing the back plate or you can swap the parts over.

6. Remove all adhesive in the grove (this can be done with a plastic spudger) DO NOT
use any metal objects as this will scratch the bezels and other parts of the camera.

7. Carefully cut and put new 1 mm tape in the grove make sure you cover the whole area
of the groove, do no overlap the tap on each other or will not sit properly.

8. Tilt the plastic bezel upwards, and wiggle the plastic until you have enough room, to
connect the ribbon back to the LCD back circuit, stick the tape back, and carefully from the
top drop it down into the bezel and make sure all the notches are down and holding the
ribbon into place.

9. Once seated, carefully put back all the screws, and use plastic grips, to clamp the screen to the
bezel, and leave it overnight so that in can adhere to the bezel properly, test it out and enjoy.

IMPORTANT NOTE:

The back plate is not removable on the EM1, this is why the LCD needs to come out from the front side.


Tools needed:

1. Lots of guitar picks
2. 1mm double sided adhesive
3. Carpet tape (double sided)(the dimensions of the square that needs to be cut is 1" by 1 1/2 inches)
4. Heat gun or blow dryer (if it gets hot enough)
5. P0 star screw driver.
6. Small suction cup with ring.
7. Tweezers (plastic)
8. Plastic Spudger for mobile.
 

Latest threads

Top Bottom