Rick Poore
New to Mu-43
- Joined
- Oct 22, 2017
- Messages
- 5
In May 2018, Fotodiox announced its line of TLT ROKR lens adapters that provide both tilt and shift capabilities in one adapter. Previously Fotodiox had regular, tilt-only and shift-only lens adapters. The only other widely available tilt and shift adapter we had for micro four-thirds was the Kipon adapter.
The new TLT ROKR series is available to adapt different varieties of lenses to micro four-thirds: Pentax 645, Mamiya 645, Bronica ETR, Canon EF, Minolta Rokkor, Nikon F/G and Olympus OM. US retail prices is $200, and is available from the usual large online photography suppliers. I purchased the adapter for Nikon F/G mount lenses.
Adapter
Below is a picture of the front side adapter, where the lens mounts. The yellow circle shows the tab to press to release an attached Nikon F-mount lens. The red circle shows the knob that controls friction on the lens shift function. To shift the lens, just push the lens down. The purple circle shows the tab to press to shift the left or right; there are detents every 1 mm. The green circle shows the button to press to rotate the entire assemble, there are detents every 22.5 degrees. The large blue ring is used to adjust the aperture on Nikon G-type lenses; it moves the aperture stop-down lever circled in blue, engaging with the matching tab on the back of the lens.
Tilt only goes in one direction; to tilt up instead of down, the entire assembly must be rotated 180 degrees. The tilt and shift functions are fixed at 90 degrees from each other, so if the adapter is set up to tilt down, then shift is limited to left and right. The adapter weighs 159 grams (5.6 ounces). It is made entirely from metal; I couldn't see any plastic parts. The inside of the barrel is painted flat black to minimize reflections.

Next is a picture of the backside of the adapter. The red dot is the index mark to line up with the red dot on the camera body. When the adapter rotates, only the black part rotates while the silver part remains stationary when attached to the camera.

Testing Tilt
I tested the adapter on my Panasonic G3. All photos below were processed in Adobe LightRoom, white balanced on the gray target and exposure adjusted so the white square on the orange target has L*=75. All of the photos were manually focused on the orange target using magnified view on the G3 (no focus confirmation available, unlike the G85).
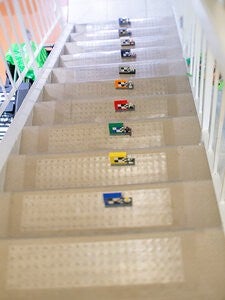
Below is a test shot of some focus targets placed on my stairway. The camera is mounted about six feet high on a tripod, pointed down the stairs. The first shots are with a Nikon 100/2.8 lens. They were shot at f/2.8, where the depth of field at 10 feet to the orange target is around plus or minus two inches. The first shot shows the narrow depth of field with lens untilted. The green target is closest to the camera and the white target is farthest from the camera; both are out of focus.

I then tilted the lens downward, capturing roughly the same field of view and again focusing on the orange target. With the lens tilted, the plane of focus is shifted away from being parallel to the sensor to parallel to the stairway, and now all of the targets are in focus. Adjusting for tilt will require some experience to get used to. Unlike the tilt and shift lenses from Canon and Nikon, there are no easy to use multi-turn knobs for smoothly adjusting tilt and shift. With the Fotodiox TLT ROKR, you just push on the lens to tilt it. The knurled brass knob on the side is used to adjust friction of the tilt function or to lock the tilt in place. While it relies on friction to hold it, I didn't see the lens droop when not locked. When the lens is tilted down, the field of view obviously moves, so the ball head on the tripod needed to be loosened so the camera could be tilted in the opposite direction to maintain the original field of view.
Another experiment, this time with a Nikon 35mm f/2.0 Ai-S lens. This was shot at f/2.0, where the depth of field at 10 feet (roughly the distance to the orange focus target) is plus or minus 8 inches. The orange target and maybe the adjacent red and gray targets are in focus, but that's it.
Now with an optimum tilt downward, all of the targets are in focus.
We can use the tilt function in the opposite direction, tilting up to minimize how much falls on the plane of focus.
Shift
I did a couple of very basic tests with the shift capability, but don't have any good photos to demonstrate the effect yet. To shift the lens, the small tab is pressed and the lens can be shifted, 9 mm in either direction. There are detents on the shift every millimeter, with zero and plus or minus five clearly marked.
Summary
Pros: Micro four-thirds users now have a second tilt and shift lens adapter available. It is solidly made and allows tilt and shift to be applied at the same time. The price is reasonable for the functionality.
Cons: Doesn't fit every camera (not my G85, barely my G3). The tilt and shift directions are fixed at 90 degrees from each other. Adjustment of tilt and shift is somewhat crude; I can't imagine using it off a tripod.
Sadly, I will have to return it as I can't use it on my G85. My plan was to buy a wide angle Nikon mount lens to replicate the standard 24 mm full-frame tilt-shift lens field of view and functionality. The lenses I was considering were:
The new TLT ROKR series is available to adapt different varieties of lenses to micro four-thirds: Pentax 645, Mamiya 645, Bronica ETR, Canon EF, Minolta Rokkor, Nikon F/G and Olympus OM. US retail prices is $200, and is available from the usual large online photography suppliers. I purchased the adapter for Nikon F/G mount lenses.
Adapter
Below is a picture of the front side adapter, where the lens mounts. The yellow circle shows the tab to press to release an attached Nikon F-mount lens. The red circle shows the knob that controls friction on the lens shift function. To shift the lens, just push the lens down. The purple circle shows the tab to press to shift the left or right; there are detents every 1 mm. The green circle shows the button to press to rotate the entire assemble, there are detents every 22.5 degrees. The large blue ring is used to adjust the aperture on Nikon G-type lenses; it moves the aperture stop-down lever circled in blue, engaging with the matching tab on the back of the lens.
Tilt only goes in one direction; to tilt up instead of down, the entire assembly must be rotated 180 degrees. The tilt and shift functions are fixed at 90 degrees from each other, so if the adapter is set up to tilt down, then shift is limited to left and right. The adapter weighs 159 grams (5.6 ounces). It is made entirely from metal; I couldn't see any plastic parts. The inside of the barrel is painted flat black to minimize reflections.

Subscribe to see EXIF info for this image (if available)
Next is a picture of the backside of the adapter. The red dot is the index mark to line up with the red dot on the camera body. When the adapter rotates, only the black part rotates while the silver part remains stationary when attached to the camera.

Subscribe to see EXIF info for this image (if available)
Testing Tilt
I tested the adapter on my Panasonic G3. All photos below were processed in Adobe LightRoom, white balanced on the gray target and exposure adjusted so the white square on the orange target has L*=75. All of the photos were manually focused on the orange target using magnified view on the G3 (no focus confirmation available, unlike the G85).
Below is a test shot of some focus targets placed on my stairway. The camera is mounted about six feet high on a tripod, pointed down the stairs. The first shots are with a Nikon 100/2.8 lens. They were shot at f/2.8, where the depth of field at 10 feet to the orange target is around plus or minus two inches. The first shot shows the narrow depth of field with lens untilted. The green target is closest to the camera and the white target is farthest from the camera; both are out of focus.

Subscribe to see EXIF info for this image (if available)
I then tilted the lens downward, capturing roughly the same field of view and again focusing on the orange target. With the lens tilted, the plane of focus is shifted away from being parallel to the sensor to parallel to the stairway, and now all of the targets are in focus. Adjusting for tilt will require some experience to get used to. Unlike the tilt and shift lenses from Canon and Nikon, there are no easy to use multi-turn knobs for smoothly adjusting tilt and shift. With the Fotodiox TLT ROKR, you just push on the lens to tilt it. The knurled brass knob on the side is used to adjust friction of the tilt function or to lock the tilt in place. While it relies on friction to hold it, I didn't see the lens droop when not locked. When the lens is tilted down, the field of view obviously moves, so the ball head on the tripod needed to be loosened so the camera could be tilted in the opposite direction to maintain the original field of view.

Subscribe to see EXIF info for this image (if available)
Another experiment, this time with a Nikon 35mm f/2.0 Ai-S lens. This was shot at f/2.0, where the depth of field at 10 feet (roughly the distance to the orange focus target) is plus or minus 8 inches. The orange target and maybe the adjacent red and gray targets are in focus, but that's it.

Subscribe to see EXIF info for this image (if available)
Now with an optimum tilt downward, all of the targets are in focus.

Subscribe to see EXIF info for this image (if available)
We can use the tilt function in the opposite direction, tilting up to minimize how much falls on the plane of focus.

Subscribe to see EXIF info for this image (if available)
Shift
I did a couple of very basic tests with the shift capability, but don't have any good photos to demonstrate the effect yet. To shift the lens, the small tab is pressed and the lens can be shifted, 9 mm in either direction. There are detents on the shift every millimeter, with zero and plus or minus five clearly marked.
Summary
Pros: Micro four-thirds users now have a second tilt and shift lens adapter available. It is solidly made and allows tilt and shift to be applied at the same time. The price is reasonable for the functionality.
Cons: Doesn't fit every camera (not my G85, barely my G3). The tilt and shift directions are fixed at 90 degrees from each other. Adjustment of tilt and shift is somewhat crude; I can't imagine using it off a tripod.
Sadly, I will have to return it as I can't use it on my G85. My plan was to buy a wide angle Nikon mount lens to replicate the standard 24 mm full-frame tilt-shift lens field of view and functionality. The lenses I was considering were:
- Rokinon/Samyang 10/2.8, APS-C
- Venus Laowa 12/2.8 Zero-D, full-frame; the largest image circle, allowing the most shift
- Tokina ATX 11-16/2.8, APS-C zoom
- Tokina ATX 11-20/2.8 APS-C zoom