Before and After

walt_tbay

Mu-43 Veteran
Joined
Aug 24, 2010
Messages
322
Location
Ontario, Canada
Inspired by another thread, I found this photo of an owl that I took a while back. The owl lives at our small local zoo in a fairly large pen behind a chain link fence. The shot was challenging because the pen is relatively large and the owl kept to a dark, shadowy corner that was quite far from my vantage point. I wasn't very impressed with the original shots, but decided to play around with LR3 to see if I could fix things up. Here are the before and after shots.


Before

Owl_Before.jpg
Subscribe to see EXIF info for this image (if available)


After

Owl_After.jpg
Subscribe to see EXIF info for this image (if available)


I made a number of adjustments to this photo using LR3. The adjustments included the following:

- Blacks set to +5
- Brightness set to +50
- Contrast set to +25
- Tint set to +1
- Sharpen Detail set to +83
- Sharpen Radius set to +2.3
- Sharpening set to +50
- Shadow Tones set to -100
- Colour Noise Reduction set to +25
- Highlight Tones set to +75
- Shadow Tones set to -33
- Dark Tones set to -25

I also used the clone tool to fill in the crack in the wall behind the owl.

I'd really be interested to see other "before and after" examples where otherwise bland photos were fixed up in post-processing. I'd also be interested in any tips other members have for working this magic.
 

penfan2010

Mu-43 All-Pro
Joined
Nov 12, 2010
Messages
1,098
Location
NJ, USA
Nice!

Thanks for the photos. I've only used iPhoto and PS Elements, but have heard a lot of great things about LR. Your comparison makes me want to get LR now!
 
Joined
Oct 9, 2010
Messages
7,397
Location
Brisbane, Australia
Real Name
Nic
I can't give as detailed a description as Walt as I don't remember exact numbers, I don't have Lightroom, and I'm still a bit of a hack at post-processing. I've tried to remember the processes. I'm currently getting by with a mix of Olympus Master 2 for basic editing and a four-year-old copy of Photoshop for more advanced operations. Hopefully some others can show some more before-and-after examples using more modern software.

The first picture was taken using a Canon FD 20/2.8 which contrary to the item description when I bought it had some fungus in the internal elements. Well the lens was returned to the seller but I tried to rescue some of the photos I took with it.

This is the before...

http://i883.photobucket.com/albums/ac33/ttlonline/m43/PC060879-ORIG.jpg">


...and the after. The process would have been contrast increase, convert to monochrome with sepia tint, add grain, sharpen, crop, and add vignetting. All that was to complement the dreamy, low-contrast effect I was getting from that particular lens.

<a href="http://www.flickr.com/photos/55915417@N08/5249041836/" title="PC060879-PPR Olympus Pen E-P1 Micro 4/3 by Lucky.penguin, on Flickr">[ATTACH=full]157066[/ATTACH]"640" height="640" alt="PC060879-PPR Olympus Pen E-P1 Micro 4/3" /></a>


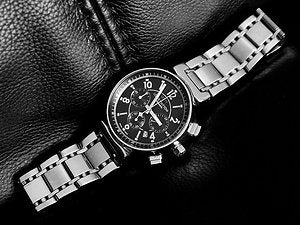
Next one is a "product shot" I did of one of my watches on my couch.

Before, a fairly bland shot...

[img]http://i883.photobucket.com/albums/ac33/ttlonline/m43/P1301720-ORIG.jpg">


...and after. Contrast and brightness, saturation boost to bring out the colours in the watch face, convert to monochrome while darkening the red channel and lightening the yellow channel to distinguish between the face and the hands, crop, contrast again, and sharpening. In particular this really brought out the texture in the leather and gives a high contrast look to the image.

<a href="http://www.flickr.com/photos/55915417@N08/5400253986/" title="P1301720-PPR Olympus Pen E-P1 Micro 4/3 by Lucky.penguin, on Flickr">[ATTACH=full]157067[/ATTACH]"640" height="480" alt="P1301720-PPR Olympus Pen E-P1 Micro 4/3" /></a>
 

Attachments

  • 5249041836_b16673d195_z.jpg
    5249041836_b16673d195_z.jpg
    105.6 KB · Views: 57
  • 5400253986_b2ca3bb6dd_z.jpg
    5400253986_b2ca3bb6dd_z.jpg
    107.4 KB · Views: 52

walt_tbay

Mu-43 Veteran
Joined
Aug 24, 2010
Messages
322
Location
Ontario, Canada
I can't give as detailed a description as Walt as I don't remember exact numbers,...

Hi Penguin:

I don't have a particularly good memory for these things. LR3 keeps a listing of each adjustment made to an image, so all I did was scan the list to see where my final adjustments landed. I'd be surprised if your version of PS didn't have that feature hidden somewhere. I had a lot of fun experimenting with this image and was quite surprised about the versatility of the program.

Thanks very much for posting your examples. I especially like the work you did on the photo of the watch. It really added a lot of "punch".

Let's hope to see some more examples.
 

Mellow

Mu-43 All-Pro
Joined
Aug 27, 2010
Messages
1,122
Location
Florida or Idaho
Real Name
Tom
I made a number of adjustments to this photo using LR3. The adjustments included the following:

- Blacks set to +5
- Brightness set to +50
- Contrast set to +25
- Tint set to +1
- Sharpen Detail set to +83
- Sharpen Radius set to +23
- Sharpening set to +50
- Shadow Tones set to -100
- Colour Noise Reduction set to +25
- Highlight Tones set to +75
- Shadow Tones set to -33
- Dark Tones set to -25

I also used the clone tool to fill in the crack in the wall behind the owl.

I'd really be interested to see other "before and after" examples where otherwise bland photos were fixed up in post-processing. I'd also be interested in any tips other members have for working this magic.

Wait--sharpen radius = +23?!? I didn't realize this number could be greater than about 2.0. It defaults at 1.0, sometimes I'll lower it to 0.8 or so and in really bad pictures might move it as high as 1.6 . . . but 23?!?

Also, I find that clarity does wonder for fur and feathers--cranking it up as high as 75 or so can really bring out the contrast and bring it alive.
 
Joined
Oct 9, 2010
Messages
7,397
Location
Brisbane, Australia
Real Name
Nic
Hi Penguin:

I don't have a particularly good memory for these things. LR3 keeps a listing of each adjustment made to an image, so all I did was scan the list to see where my final adjustments landed. I'd be surprised if your version of PS didn't have that feature hidden somewhere. I had a lot of fun experimenting with this image and was quite surprised about the versatility of the program.

Ah, that explains how you were able to do a blow-by-blow description. That's actually an excellent feature to have.

Just a thought, maybe this thread needs to be moved to the software forum?
 

Nonnit

Mu-43 Regular
Joined
Oct 19, 2012
Messages
51
Location
Iceland
From dull to better?

I was not happy with the original, I blamed the lens (panasonic 14-42 power x) being bad at the 42mm end.

But there was something about the horse in the foreground, he was standing so proud and then you had those two in the background I had to try to get something out of it.

<a href="http://www.flickr.com/photos/71317677@N02/8126402296/" title="Horse-original by Nontest, on Flickr">
8126402296_96e9e5f805_c.jpg
Subscribe to see EXIF info for this image (if available)
"800" height="600" alt="Horse-original"></a>

<a href="http://www.flickr.com/photos/71317677@N02/8126403382/" title="Horse-final by Nontest, on Flickr">
8126403382_0528592a60_c.jpg
Subscribe to see EXIF info for this image (if available)
"800" height="607" alt="Horse-final"></a>

I did try B&W but it was not working for me.

It might pass as 800X600 web image

Lightroom 4.2 (PSE 10 for some clean up)
 

mattia

Mu-43 Hall of Famer
Joined
May 3, 2012
Messages
2,395
Location
The Netherlands
Very nice. One general tip for folks wanting a little contrast punch: don't only sit there and fiddle with sliders, try playing around with the curves tool; pulling down the darks and pushing the highlights (sigmoid curve, slight) can add quite a bit of punch. Sometimes you want the opposite, though.
 

Latest threads

Top Bottom